

In this tutorial I will show you how to create a cool looking clock
app for Windows Phone 7. Expression Blend will be used for designing
this app as it is a very powerful tool for quickly creating compelling
animations.
For following the tutorial you will need to download and install the
Windows Phone 7 SDK. After finishing the installation you will end up
with Visual Studio Express for Windows Phone 7, Expression Blend for
Windows Phone 7, and Windows Phone Emulator.
The first step is to download and install the Windows Phone 7.5 SDK.
Before we start, here is the final image of what we are going to build.

Project Setup
First, you will need to create a project in Expression Blend. For this, you will need to select File > New Project in Expression Blend and select the Windows Phone Application Project template.Provide a name for your project. I will use MinimalClock for my project.

Designing the UI
Now we will put together the UI for the MinimalClock app. After the project is created you will see this in your Expression Blend:
We also need to change the layout type to Canvas instead of Grid, so we can freely move around our controls. To do this, right-click on the ContentPanel and select Canvas in Change Layout Type menu.
Once finished, your Objects and Timeline should look like this.

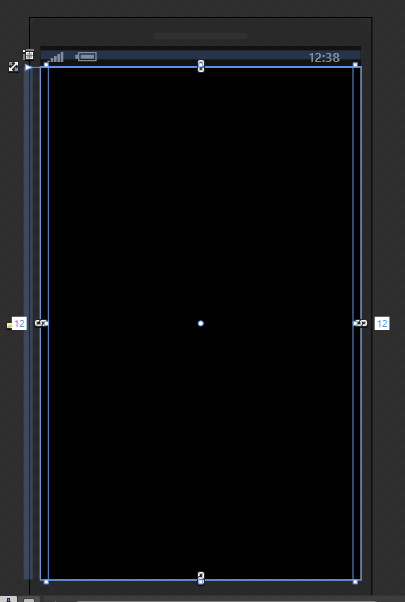 alt="Empty Application Page"
title="Empty Application Page" />
On the toolbar menu, select the Text tool and TextBlock. Draw a rectangle on your application page in any size. We will fix the size later.


- Font: Segoe WP
- Font: Size: 164
- Font Wight: Bold


- Rename TimeHours_Copy to TimeDots
- Change the Text property to :
- Rename TimeHours_Copy1 to TimeMinutes
- Change TimeMinutes Text property to 59
Positioning the Time Elements
Now, we have all the textblocks that we need for displaying the Time. All we need is to align them and place them a bit further away from each other.First, you will need to select all three controls in the Objects and Timeline palette and right-click on them, select Align and Vertical Centers.

Select the TimeHours textblock on the Ojects and Timeline palette and move it 5 pixels left. Select the TimeMinutes textblock and press the right arrow five times to move it right 5 pixels. Once, you are done you will end up with omething like this.

To do this you will need to select all TimeHours, TimeDots and TimeMinutes on the Objects and Timeline palette. Right click on the selected items and choose Group Into and Canvas.


Adding Bars and the application title
Lastly, we will add two bars. One vertical and one horizontal to make the UI a bit more interesting. We will also add the name of the app.First, make sure that ContentPanel is selected on the Objects and Timeline palette, then select the Rectangle on the toolbar or use its shortcode M. Draw a horizontal rectangle just above the TimeText control. Next, you will need to change the properties of this rectangle. Make sure that your rectangle is selected and on the Properties palette change the following:
- Set Name property to HorizontalSeparator.
- Set Height property to 4 px.
- Set Width property to 587 px.
In order to change the fill, select HorizontalSeparator and locate the last tab on the color editor called Brush resources. Then select the PhoneAccentBrush from the list.


- Set the Name property to VerticalSeparator
- Fill to PhoneAccentBrush
- Stroke to No Brush
- Width to 4px
- Height to 350px

- Set the Name property to ApplicationTitle
- Set the Text property to MOBILETUTS MINIMAL CLOCK
- Set the Foreground property to PhoneAccentStyle
- Set the FontSize property to 12pt
Creating Seconds
To create the seconds you will need to add a new TextBlock to the application page. Select the TextBlock tool from the Tools palette, or press the T key.
- Set the Name property to SecondsLabel
- Set the Text property to seconds.
To create a new style select the SecondsLabel on the design surface, right click on it and in the Edit Style menu, choose Create Empty.


- Set the Font Size to 28px.


- Set the Name property to TimeSeconds
- Set the Text property to 59
- Set the FontSize property to 140pt
- Set the Width property to 210px

Creating Date
Now we are ready to create the part that will display the current date. For this select again the TextBlock tool or press the T key to access it quickly.Draw a TextBlock just right above the HorizontalSeparator control and change its properties as the following:
- Set the Name property to DateText
- Set the Text property to 2012/12/13
- Set the Font Size to 22 pt.

Creating Days
Finally, we will create the control responsible for displaying the days. We will need seven TextBlock to display each day of the week. You will need to add the m one by one. Select the TextBlock tool from Tool palette or press the T key and place all TextBlocks on the right side of the VerticalSeparator.-
Monday
- Set the Name property to Day1
- Set the Text property to mon
-
Tuesday
- Set the Name property to Day2
- Set the Text property to tue
-
Wednesday
- Set the Name property to Day3
- Set the Text property to wed
-
Thursday
- Set the Name property to Day4
- Set the Text property to thu
-
Friday
- Set the Name property to Day5
- Set the Text property to Fri
-
Saturday
- Set the Name property to Day6
- Set the Text property to sat
-
Sunday
- Set the Name property to Day7
- Set the Text property to sun
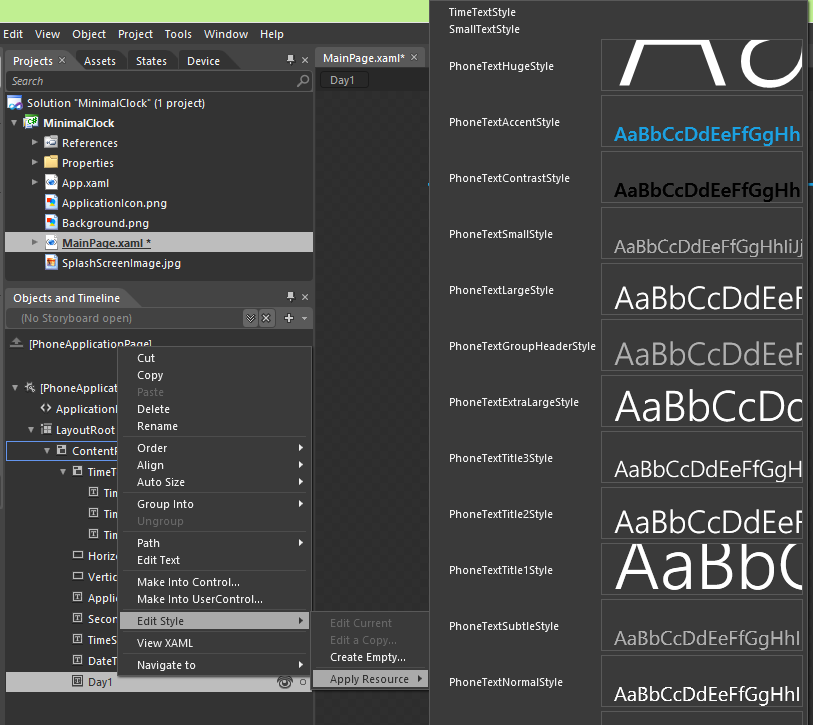 alt="Selecting SmallTextStyle" title="Selecting SmallTextStyle" />

Next we need to combine the days into a new container, so we can manipulate them easier later. With all the days selected, right click on them and select StackPanel from the Group Into menu.


For this, select the ContentPanel in the Objects and Timeline palette and then go to the Properties and change and in the Transform property group, change the Rotation Angle to -30 degrees.


- Set the Left property of DateText to 380.
- Set the Width property of HorizontalSeparator to 620, so it goes over the screen boundaries.
- Set the Left property of the ApplicationTitle to 16 to bring the application title to closer to the center of the screen.
Now that all the controls are in place, the UI is done and the animations can be added.

In the initial screenshot you can see that the separator lines are red, but in my screenshot they are blue. This happens, because the device has different accent color set up. You can change the device theme, by clicking the Device tab just next to the Project tab. Here you will be able to change the orientation of the device, applying different accent color and see how the application look like if the dark or light theme is selected. I encourage you to play around a little with the settings.

States and Storyboards
Next, we will create the initial animation that will be playing when the application launched. The animation will move the TimeText, WeekDays, TimeSeconds, DateText controls to their initial location.Animations in Expression Blend are based on creating key frames and then modify certain properties in that key frame. This will tell the animation subsystem that the property needs to be animated and the value should be as specified in the key frame. For example, if you create a key frame at 1 seconds for the TimeText and then change the location of and opacity of the control then these properties will be animated.
Creating Storyboard for the initial animation
First, you need to create a new story board in the Objects and Timeline palette by pressing the + button.


Animating TimeText Opacity
On the left hand side of the palette you can see the timeline part. Here you can move forward or backwards in time and you can add keyframes. Next, we will animate the TimeText and its Opacity property. We will animate the Opacity property from 0 percent to 100 percent in 1 second. In order to do this, select TimeText in the Objects and Timeline palette and make sure that the playhead is at 0 seconds and click the Record Keyframe button.


Animating TimeText position
Select the 0 second keyframe from TimeText. Temporarily change back the Opacity property to 95 percent, so you can see what you are doing. Then a couple of times hit the Shift and Left Arrow key combination. With this, you will move out TimeText from the screen. This will be the starting position of our movement. Do not forget to change back the Opacity property to 0 percent.Select the 1 seconds keyframe of TimeText then you will need to do the following. Hit once the right arrow key on your keyboard – moving the control 1 pixel to the right – and then hit the left arrow key once – moving the control 1 pixel to the left. With this change we will essentially record the current position of our TimeText control and instruct the storyboard to move it to this location regardless of the initial position.
Try to play the animation. If everything worked out, then you should see the TimeText moving in to the screen and gradually appearing at the same time.
One more thing we can do to spice up the animation is to configure the easing for the animation. This will make the animation more natural. For this, select the 1s key frame of our animation. Then change the Easing Function property to Back InOut on the Property palette.

Animating TimeSeconds
Next, we will be animating TimeSeconds, the control used to display the seconds part of the current time. For this, select TimeSeconds and add keyframes to the timeline at 0 seconds and at 1 seconds. Then do the following:- Select the first key frame of TimeSeconds
- Set the Opacity property of TimeSeconds to 0 percent.
- Press the shift + down arrow keys together on your keyboard a couple of times to move TimeSeconds out of the screen.
-
Select the second key frame of TimeSeconds
- Set the Opacity property of TimeSeconds to 100 percent.
- Press the down arrow on your keyboard once and then the up arrow once to record the position of TimeSeconds.
- Select the second keyframe and change the easing function to Back InOut.
- Select Weekdays in the Objects and Timeline palette and add a keyframe at 0 seconds.
- Change the opacity to 0 percent
- Move the playhead to 1 second
- Add the second key frame by clicking on the Record keyframe button .
-
Change the opacity to 100 percent.
-
Select the DateText control in the Objects and Timeline palette and add a keyframe at 0 seconds.
- Change the opacity to 0 percent
- Move the playhead to 1 second
- Add the second key frame by clicking on the Record keyframe button .
- Change the opacity to 100 percent.
Setting up the initial state
One last thing needed to be done is to quit the animation mode and change the opacity to 0 for all controls that we are animating in the InitialAnimation story board. Close the storyboard in the Objects and Timeline palette by clicking the X button next to the story board name.
Now that the animation is done, all is needed to add a bit of code to do the screen updating, so the content of our screen is updated each seconds and to start our initial animation when the application screen is loaded.
Writing a Little Code
Now the application is almost finished. All we need to do is to add a little bit of code to refresh the screen every half second and to play our initial animation.In order to update the screen periodically, a DispatchTimer needs to be created when the page finishes loading. For this, an event handler for the page loaded event needs to be created.
Create Event Handlers
First, select the application page from the Objects and Timeline palette.


DispatchTimer
First, the dispatch timer needs to be defined in the class file (MainPage.xaml.cs). A “using” statement needs to be added just after the last using stement at the top of the class file.using System.Windows.Threading;
private DispatcherTimer _timer;
        RefreshUI(this, null);

        Storyboard sb = (Storyboard)this.Resources["IntialAnimation"];
        sb.BeginTime = TimeSpan.FromSeconds(0.1);
        sb.Begin();

        _timer = new DispatcherTimer();
        _timer.Interval = TimeSpan.FromSeconds(0.4);
        _timer.Tick += RefreshUI;
        _timer.Start();
Next, a new method needs to be added to stop the timer when we leave the application. The method called OnNavigatedFrom looks like this:
    protected override void OnNavigatedFrom(System.Windows.Navigation.NavigationEventArgs e)
    {
        base.OnNavigatedFrom(e);

        if (_timer != null)
        {
            _timer.Stop();
        }
    }
    public void RefreshUI(object sender, EventArgs e)
    {
        DateTime dt = DateTime.Now;

        int seconds = dt.Second;
        int minutes = dt.Minute;
        int hour = dt.Hour;

        int year = dt.Year;

        // Time
        if (TimeHours.Text != dt.Hour.ToString())
        {
            TimeHours.Text = dt.Hour.ToString();
        }

        if (TimeMinutes.Text != dt.Minute.ToString("D2"))
        {
            TimeMinutes.Text = dt.Minute.ToString("D2");
        }

        if (TimeSeconds.Text != dt.Second.ToString("D2"))
        {
            TimeSeconds.Text = dt.Second.ToString("D2");
        }
    }

0 comments:
Post a Comment